The first thing a new diver might likely say when told they will learn to remove and replace their mask while underwater might be, “Why would I ever want to do that?” Although you’ll rarely need to remove your mask underwater, there are times when this skill can come in handy, so it’s a good one to practice — and the simple act of breathing through a regulator underwater without the mask in place can be a big confidence booster during scuba training. Veteran scuba instructors use a variety of techniques to help students master this skill. In this column we’ll go through the mask removal and replacement process, which involves flooding the mask, removing it, repositioning it on the face and clearing water from it, and securing the strap in place.
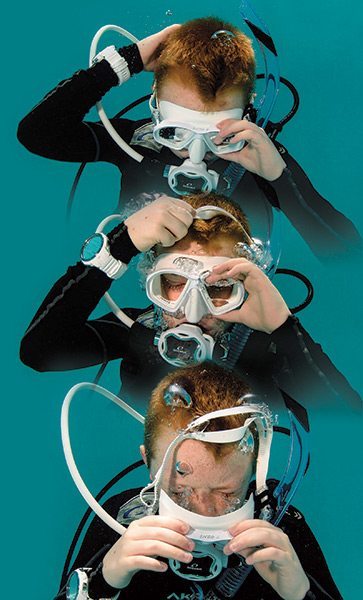
[ONE] Start the mask removal and replacement skill by slowly letting water into the mask before removing it. Do this by breaking the bottom mask seal, allowing water to enter the mask. This allows you to acclimate to the water on your face.
1. Flooding the Mask
The first step is to slowly introduce water into the mask. We suggest you do so by tilting your head down slightly as you pull the lower part of the mask away from your face just a bit, breaking the seal at the bottom and allowing water to enter. Some instructors recommend that you gently blow air from the nose as you begin flooding the mask, to prevent water from rushing into your nose. Whether or not you exhale through the nose while performing this skill, remember to keep breathing normally, inhaling through the mouth as you allow water into the mask. Never hold your breath.

[TWO] Remember, even though the mask is not in place during this skill, your regulator will still deliver air. Just keep the regulator in place and continue breathing.
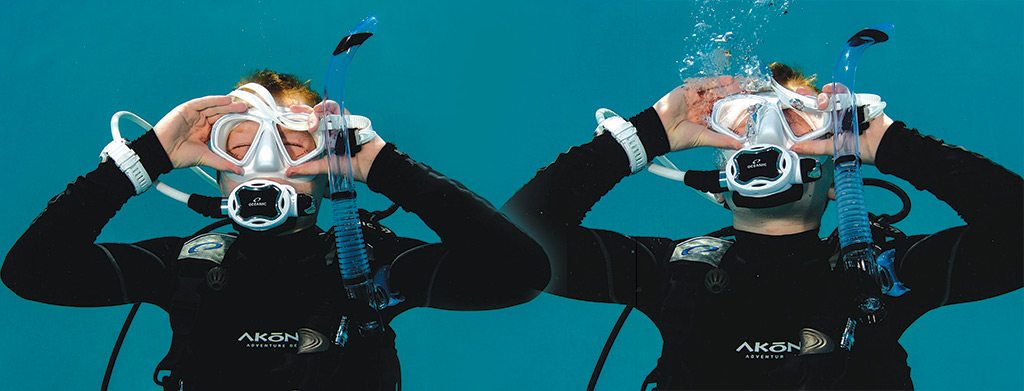
2. Removing the Mask
When the mask is completely flooded, pull the mask up and over the top of the head to completely remove the mask. Keep hold of the mask with both hands; do not let go of it.
Relax and take a few breaths in and out of the mouth before replacing the mask. While doing so, whether you open your eyes underwater or keep them closed (if you are a contact lens wearer, for instance) is a matter of personal preference. If you choose to open your eyes, keep in mind that without an air space in front of your eyes, your eyes will not be able to focus to allow you to see clearly underwater. Also, you may experience a slight tingling or stinging sensation caused by chlorine or salt water. Once you replace the mask and clear it, you can alleviate this by blinking several times. Your tears will act as a natural eye rinse.
[THREE] Once you’ve positioned the mask on your face, begin clearing it by exhaling through the nose as you tilt your head back slightly. Keep the upper mask seal sealed while breaking the bottom mask seal just enough to let water flow out the bottom of the mask as you exhale into the mask. Once the water is gone from the mask, press the mask to your face to reset the lower seal.
3. Replacing and Clearing the Mask
Before replacing the mask, first get it positioned correctly. For instance, the nose pocket should be at the bottom of the mask; otherwise you’ll be putting it back on upside down. Some instructors recommend that you place your thumb inside the nose pocket to help with mask positioning.
Next, place the mask on your face. At this point, there are two different diver preferences. Some like to clear the mask before replacing the mask strap, others prefer to have the mask strap in place before clearing. Here, we will address clearing the mask before replacing the strap.
With the mask in place and sealed on your face (run a finger along the seal to make sure no hair, mask strap or hood is preventing a good seal) it’s time to clear the mask of water.
To clear the mask, start by exhaling gently from the nose while tilting your head back. While exhaling from the nose, keep the upper mask seal sealed to your face while allowing the lower seal to separate from your face only slightly — just enough to allow the water inside the mask to flow out the bottom of the mask. As you continue exhaling through your nose, the exhaled air will displace the water, clearing the mask of water and filling it with air. You can use one or both hands to seal the upper seal and break the lower seal. Some divers use the palm of one hand to press in and down on the top of the mask. Other divers prefer to use two hands; use the index fingers to press in on each side of the mask, while using both thumbs to slightly break the bottom seal. With either technique, remember to exhale continuously through the nose while tilting the head back. If you use both hands to break the bottom seal, be careful not to pull the mask away from the face. We suggest you try both the one-handed and two-handed techniques to find which one you prefer. Once the water is gone from the mask, press the mask to your face to reset the lower seal.

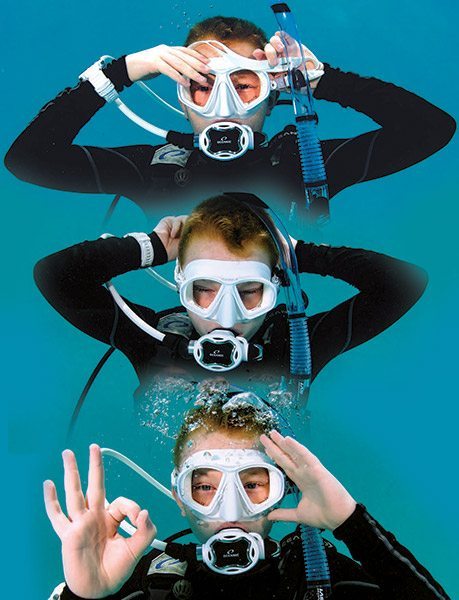
[FOUR] Press the mask against the face with one hand. Using the other hand, grab the mask strap and position it in place, feeling along the mask strap to make sure the strap and/or snorkel is not tangled.
4. Securing the Strap
Press the mask against the face with one hand. Using the other hand, grab the mask strap and position it in place, feeling along the mask strap to make sure the strap and/or snorkel is not tangled.
It’s easy to simulate the mask removal and replacement skill above water. When you feel comfortable practicing this skill above water, try it in the shallow end of a pool. And remember, even though the mask is not in place, your regulator will still deliver air. Just keep the regulator in your mouth and continue to breathe normally. You will likely find that mastering the skill of mask removal and replacement will help you become more confident underwater, making your dive experiences much more enjoyable.
Story and photos by Barry and Ruth Guimbellot